Repotting Lavender: The Hidden Signs Your Plant Needs More Space
Have you ever seen your lavender, which used to be healthy, seem a little… Tired, huh? Maybe the flowers aren’t as plentiful as they used to be, or maybe that beautiful Mediterranean scent is fading. You aren’t imagining things; your lavender might really be trying to warn you that it needs a bigger home.
When you repot lavender, you’re not just giving it additional room (though that’s a big part of it). It’s important to know what this Mediterranean beauty wants and when those demands aren’t being met. I’ve found that the right time and method can make all the difference between a healthy, fragrant lavender plant and one that is struggling and not very interesting after years of cultivating them in pots.
We’ll go into great detail about the art and science of repotting lavender in this complete guide. You’ll learn the five clear symptoms that your plant is root-bound, the best times to do things in each season, and the step-by-step approach that will keep your lavender healthy and flowering for years to come. This article will help you feel confident enough to repot like a pro, whether you’re a total beginner who just got their first lavender plant or an experienced gardener who wants to improve your skills. For those starting from scratch, you might also be interested in how to grow lavender from seed.
Why Lavender Needs to Be Repotted Differently Than Other Herbs
Before we go into the how-to, let’s talk about what makes lavender so remarkable. Most herbs are quite forgiving when it comes to living in pots. For example, basil and parsley appear to do well in nearly any pot you put them in. Lavender? Well, she’s a little more picky, and for good reason.
Your lavender comes from the stony, well-draining, and not very fruitful foothills of the Mediterranean. Lavender has evolved to these tough conditions over thousands of years by growing a woody root system that is very different from the soft, flexible roots of annual herbs. These woody roots are great at surviving dryness and bad soil, but they are also more vulnerable to wet conditions and root disturbance.
If you relocated someone from a desert to a rainforest, they would need time to get used to it, right? That’s pretty much what we’re doing when we put Mediterranean plants in pots. The problem is making a place that looks like their natural home and gives them the stability they need to grow.
This is when things get fascinating from a scientific point of view. The roots of lavender make specific chemicals that allow it live in soils that are high in minerals and alkaline. These roots can’t make these defensive substances as well when they get too crowded or wet. This makes the plant more likely to get root rot and other problems caused by stress. This is why a basil plant could get well fast after being root-bound, but lavender plants often have a hard time for months.
The changes in the growth cycle are just as essential. Lavender is playing the long game, while annual herbs spend all their efforts into making leaves and seeds quickly. As a woody herb, understanding is lavender a perennial is key to its long-term care. It’s making woody stems and a big network of roots that will support years of development and flowers. This means that when we move lavender to a new pot, we can be ruining years of meticulous root growth.
Pro-Tip: Lavender’s woody root structure may take a whole growing season to fully establish in a new container, unlike soft-stemmed herbs that can recover from root injury in a few weeks. This is why timing and technique are so important for success.
5 Clear Signs That Your Lavender Needs to Be Repotted Right Away
It’s like making a secret language with your lavender when you learn how to understand its messages. You’ll be shocked at how clearly your lavender tells you what it needs once you know what to look for. Let me show you the five signals that have always worked for me when I’ve grown lavender in containers for more than ten years.
Sign #1: The Root Spiral of Death
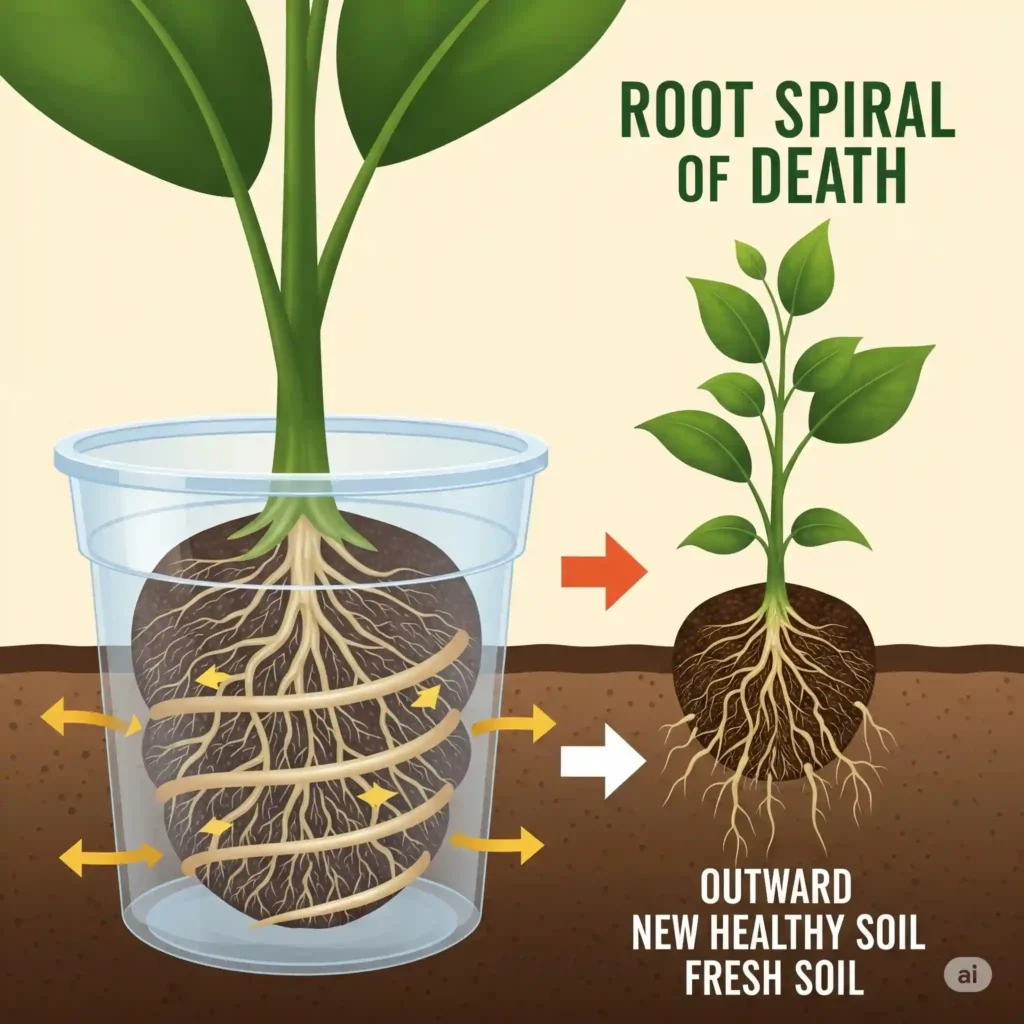
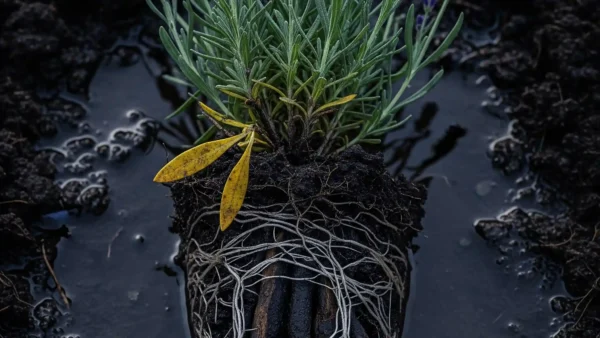
This is perhaps the most obvious indicator, but a lot of gardeners don’t see it until it’s almost too late. When lavender roots can’t grow anywhere else, they start to grow in circles around the bottom and corners of the pot. This is called the “root spiral of death.”
To inspect without hurting your plant, just tilt the pot to the side and look at the holes on the bottom. Do you see strong, woody roots sticking out? That’s the first sign that something is wrong. You might see that the root ball has taken on the shape of the container if you pull the plant up a little bit (and I mean very gently). The bottom is rounded and the sides are straight. When roots start to develop in circles like this, they often keep doing it even after being repotted, which can really slow down the plant’s growth in the future.
From a biological point of view, circling roots can’t take in water and nutrients well because they’re basically fighting with each other. Your plant’s circulatory system is like a traffic bottleneck. The exterior roots turn into wood and don’t take in nutrients as well, and the interior roots can run out of air.
Why this is especially bad for lavender: When lavender’s woody roots get too tight, they can actually start to strangle themselves, which is different from many other plants that just slow down their growth. I’ve seen situations when the primary taproot gets so tight that the whole top of the plant starts to die back, starting with the oldest branches.
Sign #2: Water Runs Through Like a Sieve
Have you ever watered your lavender and seen the water go right through the holes at the bottom of the pot as if the soil wasn’t even there? This might not be a problem with the drainage; it could be that your lavender has outgrown its pot.
When roots fill a container all the way, they push most of the soil out of the way. Instead of soaking up water, what’s left becomes compressed and keeps water out. The water takes the path of least resistance, which is usually straight down through the channels made by old, dead roots.
Here’s a simple test I do: slowly water your lavender and see how the water acts. Healthy container soil should soak up water slowly, with only a little bit of it seeping out right away. If water flows through in seconds and the soil surface still seems dry, the plant is root-bound.
This is really interesting from a scientific point of view. There are little air pockets in healthy soil that provide capillary action, which is the same force that helps water move up via plant roots. When roots fill up all of these spaces, the soil can’t hold moisture at the right level anymore. Your lavender is stuck in this awful loop where it is both drowning (because the drainage is bad) and drought-stressed (because it can’t hold on to moisture).
Sign #3: The plant isn’t growing even if you’re taking care of it perfectly.
This can be incredibly annoying because you’re doing everything properly: watering it, giving it the optimum amount of light, and fertilizing it. But your lavender just… stuck. You might see that new growth is smaller than it used to be, or that the plant stays the same size from year to year instead of getting bigger over time.
Lavender should develop steadily during its active season. New shoots should come up from the base, and the stems that are already there should get a few inches longer each year. If a plant isn’t growing even though it has enough light, water, and nutrients, the problem is nearly always in the roots.
Picture this: you’re trying to do jumping jacks in a phone booth. You have all the energy and drive you need, but you can’t do your best because of your physical limitations. That’s exactly what happens to lavender that is root-bound.
From a plant’s point of view, when roots can’t grow, the plant switches from growth mode to survival mode. It starts making stress hormones that slow down growth to save energy. This is an evolutionary change that helps wild plants withstand drought or bad soil, but in a pot, it just means your plant is always stressed.
Pro Tip: Every spring, write down the height and width of your lavender in a simple garden journal. If a healthy, well-established plant doesn’t grow at least 10–15% per year, you should think about repotting it.
Sign #4: The Flowering Failure Pattern
This is when things become really exciting. The way lavender flowers is intimately related to the health of its roots, and changes in the way it flowers can tell you a lot about what’s going on below ground. A lack of blooms can be a sign of a root-bound plant, but it can also be related to knowing when to cut back lavender to encourage new growth.
During its growing season, a healthy lavender plant should have several flushes of flowers. The timing of these flushes will depend on the type of lavender and the climate. But when roots are restricted, you might see that flowers are smaller, less common, or don’t last as long. The most obvious indicator is when flower spikes start to look shorter and less dense than they did in prior years.
This happens because making flowers takes a lot of energy. The plant has to move water, nutrients, and photosynthetic products from the roots to the blooms that are growing. This transport mechanism doesn’t work as well when the root system is damaged. The plant might still try to blossom, as that’s its main purpose, but it can’t support the big, luxuriant flower spikes you’re used to seeing.
I’ve also seen that lavender that is root-bound frequently makes less essential oil. The beautiful, fragrant flowers that used to fill your garden with their scent might not smell as strong anymore. When you think about how energetically costly it is to manufacture essential oils and how important it is to receive the right nutrients, this makes sense.
Sign #5: The Tipping Point (Literally)
This last indicator can be taken literally or figuratively. If your lavender starts to tip over easily and is top-heavy, it means that the root system can’t support the growth above ground anymore.
A healthy lavender plant has a root system and foliage that are about the same size. The roots should grow in proportion to the plant’s size and woodiness above ground to give it support and stability. The plant becomes unstable when this equilibrium is off, which normally happens when the roots reach the edges of their container.
You will notice this more on windy days or after watering, when the extra weight of the water in the soil makes the pot even less sturdy. This instability isn’t simply because of physics; it’s also a hint that the root system isn’t working as well as it could.
Boxout of Common Mistakes: The 5 Most Common Mistakes That Kill Lavender When You Replant It
- Repotting while the flowers are still blooming—Wait until the flowers are done.
- Using ordinary potting soil—Lavender needs a specific Mediterranean-style mix.
- Watering right after repotting—Give the plant 24 to 48 hours to settle first.
- Picking a pot that’s too big—only go up 2 to 4 inches in diameter.
- Repotting in the summer heat—Spring or early fall are far better times to do it.
When is the best time to repot lavender?
Now that you know what to look for, let’s speak about when to really do something. It’s not simply vital to repot lavender at the right time; it’s really important. If you don’t do this right, your plant will have to fight for months, even if you use the right technique.
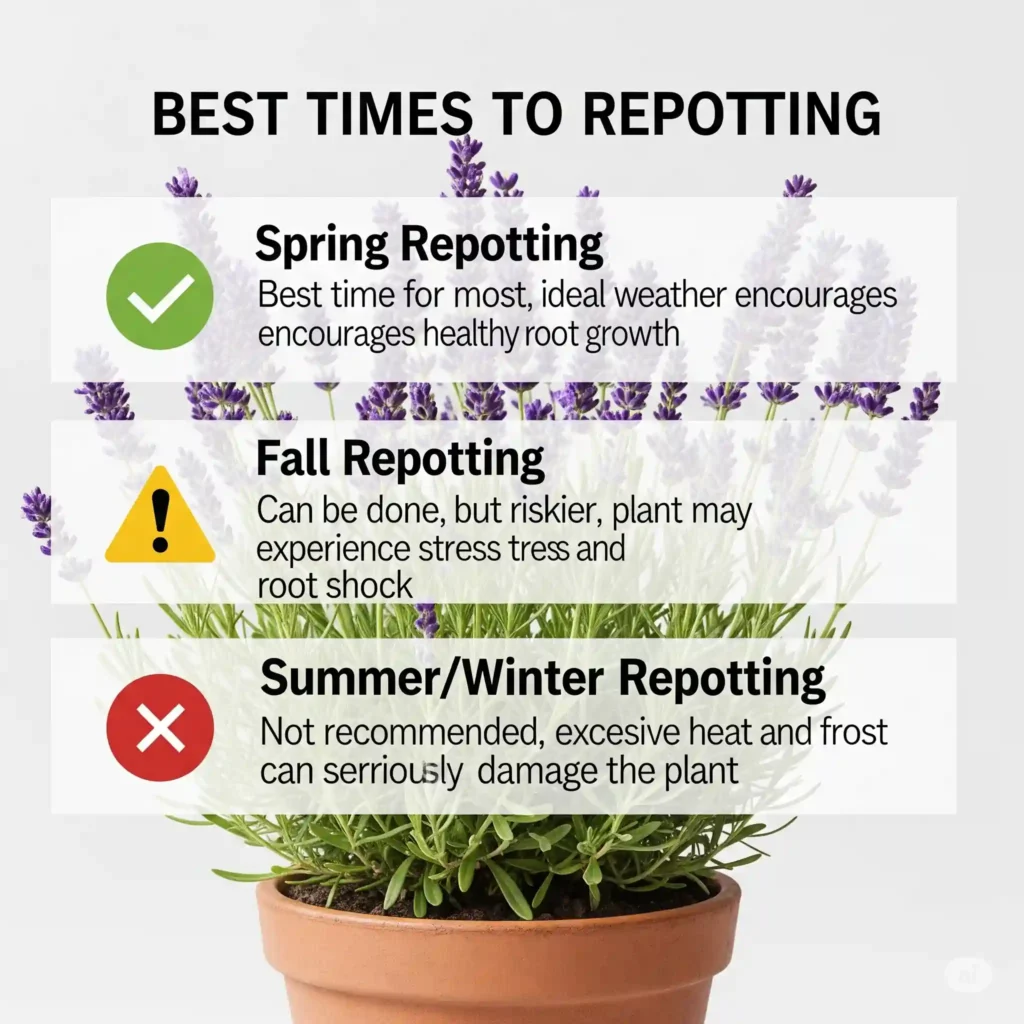
The best time overall is in the spring.
Spring is the time of year when nature comes back to life, and it’s also the best time to repot lavender. But we’re not talking about any old spring day. The time of year is very important.
I call the best time the “pre-growth window.” This is the time between the last frost and when your lavender starts to grow new leaves. In most temperate regions, this happens between late March and early May, depending on where you live and how the weather is that year.
This timing works so well because lavender is naturally programmed to devote energy into growing roots at this time. In the wild, Mediterranean plants employ the warm spring weather and longer days to grow their roots before the tough summer months. During this time, repotting the plant will be easier because it will be in sync with its natural rhythms.
Spring repotting is good for the plant’s health since it lets it build its new root system when the weather is mild and there isn’t much stress. The longer days cause hormones to be made that help roots grow, and the cool nights assist stop transplant shock.
Secret of the Master Gardener: I always wait three days in a row when the temperature is between 55 and 70 degrees Fahrenheit before repotting. This provides the plant the best chance to settle into its new environment without having to deal with temperature changes.
Fall repotting: a risky but sometimes necessary choice
Sometimes life doesn’t go along with our plans. You might not have seen the signals until late summer, or you might have seen a magnificent plant at the nursery in September that you just had to have. You can repot in the fall, but you need to be careful and have reasonable expectations.
To successfully repot lavender in the fall, you need to know what it is trying to achieve at this time of year. Lavender naturally starts to get ready for dormancy as the days get shorter and the temperatures drop. This means that the plant will grow more slowly, take in less water, and save energy, which are not the best conditions for putting down new roots.
But there are times when you need to repot in the fall. If your lavender’s roots are really tight and it’s showing signs of stress, it could be better to repot it in the fall than to leave it in its current container. In mild temperature zones where the growth season lasts far into fall, I’ve also had luck with fall repotting.
The steps I’ve come up with for repotting in the fall:
- Only repot when it’s warm and calm (at least 60°F)
- Put more drainage material in the new pot
- After repotting, cut back on how often you water your plants by a lot.
- Protect from the wind for the first month
- If the temperature drops abruptly, think about getting temporary cold protection.
Lavender that has been repotted in the fall will need protection in the winter if it lives in a colder area. Think of it as a patient who has just had surgery. They require additional care and protection while they heal.
The Danger Zones in Summer and Winter
These are the times of year when repotting lavender goes from “difficult” to “potentially deadly.” But if you really have to repot during these times, knowing why they are risky will help you make wiser choices.
It is hard to repot lavender in the summer because it is already stressed by the weather. The plant is trying as hard as it can just to stay alive because of the high temperatures, strong sunlight, and extra water needs. The stress of repotting during this period typically pushes the plant above its capabilities.
The body’s response to stress during summer repotting can be very strong. Lavender closes its leaf pores (stomata) when it gets too hot to save water. This also makes it harder for the plant to take in carbon dioxide for photosynthesis. This makes an energy crisis happen just when the plant needs the most energy to grow new roots.
There are a number of reasons why repotting in the winter is risky. When the weather gets cold, lavender’s metabolism slows down a lot, which means it can’t immediately respond to changes in the environment or damage to its roots. Below 40°F, root growth almost stops, so any shock from transplanting will last for months instead of weeks.
Rules for emergency repotting during the off-season: If you really have to repot in the summer or winter, think of it as plant triage. Limit damage to the roots, protect the environment right away (shade cloth in the summer and cold frames in the winter), and be ready for a much longer healing time.
Science of Picking the Right Container for Your Lavender’s New Home
When it comes to taking care of lavender, choosing the correct container is where art and science meet. The pot you choose will have a direct impact on how your plant grows, stays healthy, and lives. I can tell you that this choice is much more crucial than most gardeners think because I’ve seen hundreds of lavender plants do well or poorly based only on their containers.
The Goldilocks Principle for Pot Sizing says that size matters.
For lavender, the idea that “bigger is better” when it comes to container size can really be bad. Lavender needs a pot that is about the perfect size: big enough for it to thrive, but not so big that it causes problems with moisture and root growth.
The theory behind getting the right size is that lavender’s roots grow in proportion to how much water and nutrients they need. The dirt in the outer portions of a large container stays wet longer than the plant can use, which makes the roots rot. Keep in mind that lavender grew in rocky, well-draining soils where extra water quickly goes away.
My tried-and-true formula for sizing:
- For the first repotting, make the diameter 2 to 3 inches bigger.
- For plants that are already growing, the diameter should only be 3–4 inches bigger.
- The depth should be the same as or a little more than the breadth.
Lavender’s natural growth pattern is what makes this work. In the wild, lavender roots grow outward rather than plunging deep, following the natural slope of slopes and searching out areas of improved drainage. By copying this horizontal growth pattern in our containers, we help the roots grow better.
Things to think about for each variety:
- English lavender (Lavandula angustifolia): usually stays smaller, with a final diameter of 12 to 16 inches.
- French lavender (Lavandula stoechas): stronger and can grow in containers that are 16 to 20 inches wide.
- Spanish lavender (Lavandula dentata): the strongest, might need pots that are 18 to 24 inches deep.
Tip: When deciding on the next container size, I always measure the present root ball instead of just the pot size. Sometimes plants are under-potted to begin with, and sometimes they’ve been in the same pot so long that the root ball is substantially smaller than the container.
Material Matters: Clay, Plastic, and Everything Else
The material of your pot influences more than just how it looks. It also affects the health of your lavender by controlling the temperature, moisture, and oxygen levels in the roots.
For most cases, I recommend terra cotta and unglazed clay. These materials have holes in them that let extra moisture escape through the walls and give roots better access to oxygen. The thermal mass of clay also helps keep roots from being too hot in the summer and too cold at night.
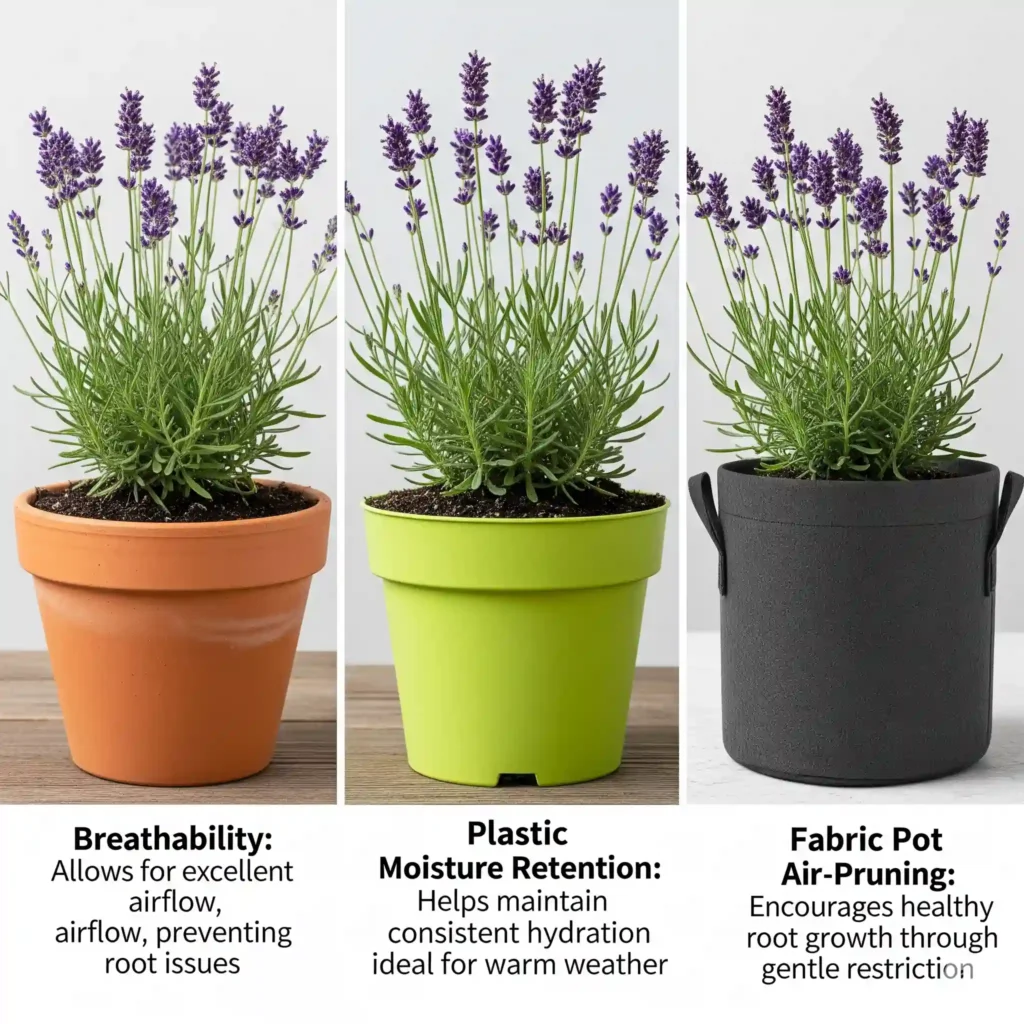
What’s the bad thing? Clay pots dry up faster, so you’ll need to water them more often in hot weather. They are also more delicate and heavier. These trade-offs are usually worth it for lavender, even if it prefers the Mediterranean.
Glazed ceramic pots are a good compromise. They keep moisture better than terra cotta, yet they still have good stability and thermal mass. The most important thing is to make sure the drainage holes are big enough. Since the surface isn’t porous, all extra water has to get out through the bottom.
A lot of people don’t like plastic containers, but if you pick the right ones, current high-quality plastic pots may be great for lavender. To keep the heat from getting in, look for pots with sturdy walls that are light in color. The main benefits are that they are lighter and hold more moisture, which might be useful in very hot, dry places.
What about pots made of fabric? These are becoming more and more popular, and for good cause. The cloth that breathes lets air and water flow through it easily, which stops the roots from circling around each other, as we talked about before. But they dry up soon and might not be stable enough for bigger lavender plants.
The Drainage Equation: Holes, Layers, and Flow Rates
Having holes in the bottom of your pot isn’t enough for good drainage. You need to build a system that lets extra water out fast while keeping exactly the right amount of moisture for healthy growth.
The rule for drainage holes: I make sure that there is at least one ½-inch hole for every 6 inches of pot diameter. For bigger pots, several tiny holes work better than one big hole because they let water drain more evenly across the bottom of the pot.
The gravel layer myth: You may have heard that you should put a layer of gravel or broken pottery at the bottom of pots to help with drainage. For most plants, including lavender, this is actually bad. The layer makes a “perched water table,” which is a place where water sits above the gravel instead of draining out. Don’t use gravel; instead, fill the whole pot with your growing media.
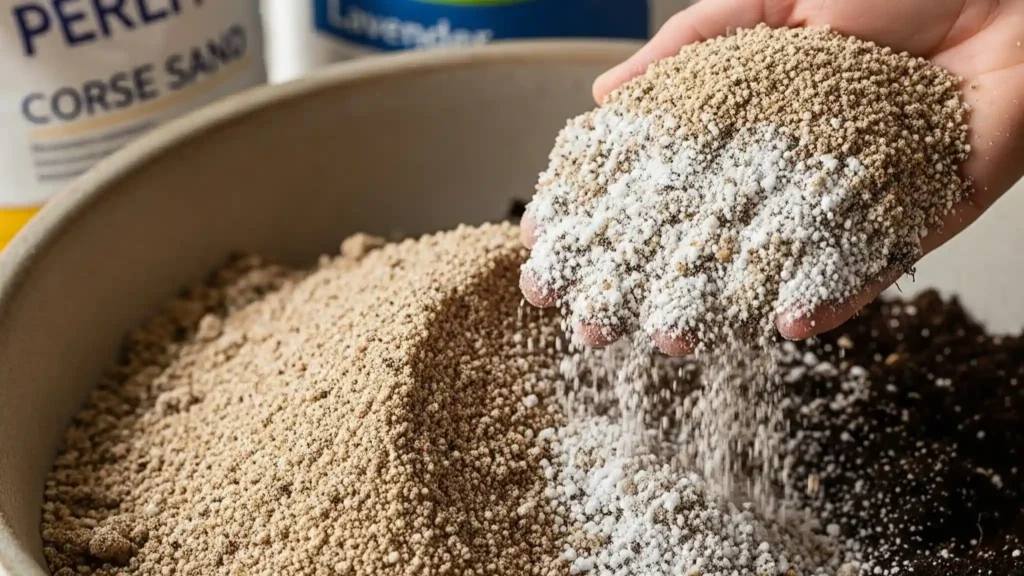
Checking the drainage before planting: I usually do this simple test with new pots: fill them with the potting mix you plan to use, wet them well, and see how long it takes for the extra water to cease draining out. You want most of the extra water to leave within 10 to 15 minutes for lavender. After that, there should just be a few drops.
Making the best drainage system:
- To keep soil from washing away, cover drainage holes with fine mesh.
- Use a potting mix that is made just for Mediterranean plants and drains nicely.
- Think about adding more coarse sand or perlite to help with drainage.
- Put the pot on feet or a plant caddy so that air can flow around it.
Checklist for the Lavender Repotting Toolkit:
✓ A new container that is 2 to 4 inches wider in diameter
✓ Mix for Mediterranean and cactus pots
✓ More perlite or gritty sand ✓ Fine mesh for holes that let water out
✓ Pruning shears that are clean and sharp
✓ Watering can with a delicate rose tip
✓ Plant stakes (if you need them for support)
✓ Fertilizer that releases slowly (optional)
✓ Mulch (little pieces of bark or gravel)
✓ Gloves for the garden
✓ Use a tarp or newspaper as a work surface
The Step-by-Step Lavender Repotting Process (A Master-Level Skill)
Now is the time to move your lavender to its new home. You need to be patient, handle things carefully, and pay attention to every little thing. If you rush through it, you could erase months of meticulous planning and observation.
Getting Ready to Repot: Getting Ready for Success
Before you even touch the plant, you need to prepare for success in repotting. I constantly remind people that careful preparation keeps them from doing poorly, and this is especially true for delicate plants like lavender.
The time of day matters more than you might think. I like to repot in the early morning or late afternoon when the weather is mild and the humidity is greater. Stay away from the heat of midday, which might stress the plant during the time after it has been repotted when it is most sensitive.
Preparing the soil is really important. You might want to just buy a bag of standard potting soil, but lavender needs something much more specific. I make my own mixture with:
- 40% potting mix of the highest quality
- 30% coarse sand or perlite
- 20% compost that has been around for a while
- 10% crushed granite or fine gravel
This mix drains fast yet still has enough water and minerals for good growth. The pH should be between 7.0 and 8.0, which is slightly alkaline. This is like the soil where lavender grows naturally.
Cleaning your tools before you start stops problems. I always clean my pruning shears and other instruments with rubbing alcohol before I start. When lavender is stressed, it might get fungal infections, but keeping equipment clean can help a lot.
Setting up your workspace saves time and lowers stress for both you and the plant. I lay down a big tarp or a few layers of newspaper, put all my tools where I can easily get to them, and have my soil mix ready in a wheelbarrow or big container.
The Gentle Extraction: Keeping Roots Safe
This is where a lot of well-meaning gardeners go wrong. Lavender has a woody root system that needs a different kind of care than the soft, flexible roots of annual flowers or vegetables.
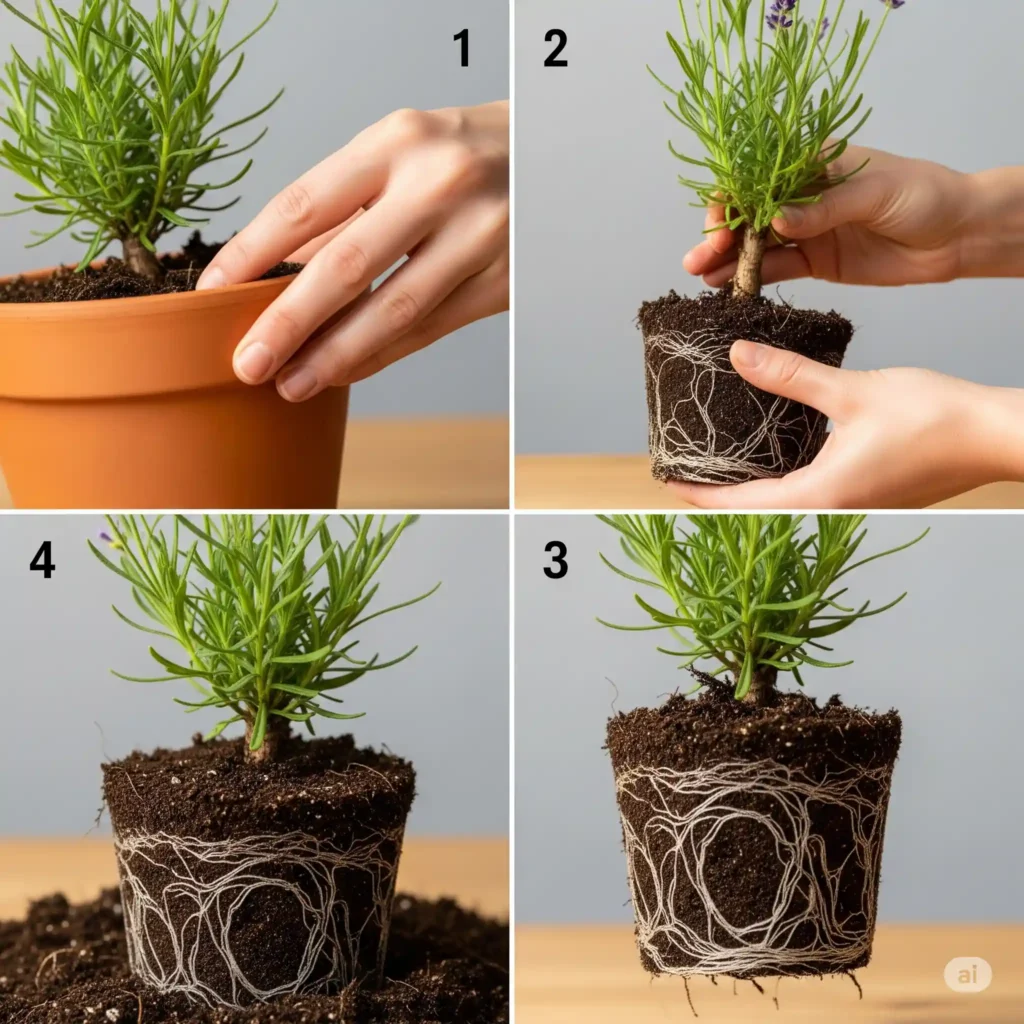
Get the correct amount of moisture first. The soil should be damp but not wet. Bone-dry earth makes it hard to get the roots out and might hurt fine roots. Soggy soil, on the other hand, makes the root ball heavy and easy to break apart.
The extraction method I’ve mastered:
- Gently tap along the edges of the pot while it is on its side.
- With one hand, hold the plant’s base steady while you slowly pull the pot away with the other.
- If the plant is very stuck, carefully use a tiny knife to pull the roots away from the pot walls.
- Always support from the root ball and never tug on the stems or leaves.
What to expect when you see the roots: Don’t worry if the root ball looks full or if you see some brown, woody roots. Lavender does this all the time. If you smell something sour (which means root rot) or if the roots are mushy instead of hard, you should be worried.
How to handle plants with very tightly coiled roots: Sometimes the root ball will be so tightly wound that it seems like a solid mass. For these situations, I use a sharp, clean knife to cut 3 to 4 vertical lines about 1/2 inch deep down the sides of the root ball. This makes the roots grow out into the new soil.
Managing Roots: Choosing Between Pruning and Loosening
This is where having experience truly helps. Knowing when to cut roots and when to only loosen them might make the difference between a plant that does well and one that has trouble for months.
When to loosen instead of prune: If the roots are circling but are still white or light brown and firm, mild loosening is typically enough. I carefully pull apart the outer roots with my fingertips, starting at the bottom and working my way up. The idea is to get these roots to grow out into the fresh soil instead of staying in their circles.
When to prune roots: If the roots are dark brown or black, mushy, or so tightly wound that they can’t be loosened, it’s time for surgery. I cut off about a third of the bottom root mass with clean, sharp scissors and then make vertical cuts up the sides, as I said before.
The science behind stimulating roots: Cutting healthy roots cleanly makes them create auxins, which are root hormones. These hormones help the plant produce new roots and settle into its new pot more rapidly. This only works on healthy tissue, though; severing unhealthy roots merely makes the problem worse.
Things to keep in mind about lavender’s taproot: Lavender often grows a central taproot, which is different from many other container plants. You might need to cut this root if it has grown in a spiral or is showing symptoms of injury. Even if it takes taking off many inches, cut it back to healthy tissue. The plant will grow new feeder roots to make up for the loss.
Tip: I always spray the cut root surfaces with rooting hormone that has fungicide in it. This isn’t necessary for plants to be healthy, but it gives them extra protection against root rot during the time when they are most vulnerable.
The Best Place for Plants and How to Mix Them with the Soil
Getting the plant placement properly is important for both short-term stability and long-term health. This stage will tell you how well your lavender will grow in its new habitat.
Depth is very important. You should plant lavender at the same depth it was growing in its last pot. If you plant too deep, you could get crown rot. If you plant too shallow, the roots can dry out or become weak.
I do this: I put some dirt in the bottom of the new pot, then I put the plant in place and move the dirt around until the top of the root ball is about 1/2 inch below the rim of the pot. This gives you room to water while making sure the depth is right.
Soil integration technique: Instead of just dumping soil on top of the root ball, I add it slowly and delicately move it around and under the roots with my fingers. This gets rid of air pockets that could dry out roots or make things unstable.
The watering-in process: This is not the same as normal watering. I use a watering can with a fine rose attachment to gently pack the soil around the roots. The idea isn’t to soak the soil all the way through; it’s to get rid of air pockets and make sure the roots are in good touch with the soil.
Final positioning details: The plant should be centered in the pot and standing upright. Lavender plants can get very big, and a plant that starts out crooked will only get more unstable as time goes on.
The first month after repotting is very important for care.
The month after you repot your lavender is very important. During this time, how you take care of the plant will decide if it grows well or just stays alive.
Watering plan for the first week: Less is better. The roots of the plant have been damaged, so they can’t take in water like they should. I only water every two to three days, just enough to keep the soil a little damp. Don’t worry if the plant seems a little drooping for the first few days; this is typical. Just keep an eye out for symptoms of wilting.
Managing light and temperature: For the first week, put your newly repotted lavender in bright, indirect light. Even though it usually lives in full light, it needs softer circumstances at first because it is stressed by being repotted. Stay away from very hot or cold weather and strong winds.
The two-week transition: You should start to witness new growth or more energy after roughly 10 to 14 days. You can start to slowly go back to your normal care routines at this time. Put the plant back where it likes the sun and water it as usual.
Signs that your lavender is settling in well: New growth at the tips of the branches, better leaf color, and a strong, upright stance are all signs that your lavender is settling in well.
Case Study: Revival Success Story—How to Save a 7-Year-Old English Lavender
Last spring, I saved an English lavender that had been badly neglected from a friend who was leaving. The plant was in a container that was only 6 inches wide (it needed at least 14 inches), the root ball was mostly roots, and it hadn’t bloomed right in over two years.
The problem: The roots were so tightly packed that the whole thing had taken on the shape of the nursery container. Water flowed through in seconds, and new growth was slow and thin.
The answer: I employed the aggressive root pruning method, which involved cutting off almost half of the root mass and making deep vertical incisions to break the circular pattern. I put the plant in a 16-inch terra cotta planter with my own Mediterranean mix.
The recovery: In the first two weeks, the plant showed signs of stress from the transplant, like drooping. The first hints of fresh development appeared in weeks 3 and 4. The plant had grown twice as big and made its first real flower spikes in years by the third month.
Current status: Eighteen months later, this lavender is one of the strongest in my collection. It blooms several times a season and fills its pot nicely.
Important lessons: With the right method and a little patience, even root systems that are very injured can heal. The strong approach was dangerous but necessary because softer measures wouldn’t have broken the established circular growth pattern.
Troubleshooting Guide: What to do if your lavender repotting goes wrong
Even if you do everything right, repotting doesn’t always work as planned. Plants are living things, and they don’t always act the way you expect them to. The most important thing is to spot problems early and deal with them correctly.
The Wilting Crisis: How to Find Out What’s Wrong and Get Better
I hear a lot of people worry about their plants wilting after they are repotted. The good news is Not all wilting is the same, and a lot of it is quite normal and will go away on its own.
Normal transplant wilting happens to the whole plant evenly, shows up 24 to 48 hours after repotting, and starts to get better within a week. Crisis wilting is usually worse, can just impact some portions of the plant, or keeps becoming worse beyond the first week.
What happens to the roots during transplant shock: When they are disturbed, they can’t take in water as well for a short time. This makes the plant tissues lose water, which makes the cells lose turgor pressure and the leaves droop. It’s like when you become dizzy after standing up too fast for a plant.
Emergency help for extreme wilting:
- Put the plant in a place where it gets bright, indirect light.
- Use a humidity tray or a temporary plastic tent to raise the humidity around the plant.
- Less air movement: even a light breeze might stress a plant that is withering.
- Check the soil’s moisture level; it should be slightly damp but not wet.
- Don’t give in to the impulse to fertilize; plants under stress can’t use nutrients correctly.
Recovery timeline: Most lavender will get better in 3 to 5 days and be back to normal in 2 weeks. If wilting continues or gets worse beyond this stage, look into other possible causes, such as root rot or pest problems.
Secret of the Master Gardener: I always have a spray bottle with water and a few drops of liquid kelp fertilizer on hand for when plants start to wilt. If you don’t spray the flowers and buds, a light spritz with this solution can help for a short time as the roots heal.
Signs of Root Rot After Repotting
Root rot is the worst thing that can happen to a container gardener, and occasionally repotting might make things worse or make them more likely to get sick. It is really important to find things early and respond quickly.
How to tell if you have root rot: The soil smells sour and musty, which is the most obvious sign. Some signs you can see are roots that are blackened or mushy, leaves that turn yellow from the bottom up, and a general lack of plant health that doesn’t get better with time.
Why repotting can sometimes cause root rot: Moving sick roots can disseminate fungal spores throughout the root structure. Also, plants that are under stress are more likely to get opportunistic infections, and too much water during the recovery period can make it easier for fungi to thrive.
Protocol for immediate action:
- Take the plant out of its new pot right away.
- Carefully wash away all the dirt from the roots with warm water.
- Cut off all the brown, mushy, or dark-colored roots with sterilized shears.
- Use a fungicide solution on the healthy roots that are left.
- Put the plant in a new, clean potting mix.
- Watering less often is a big help.
Ways to stop it from happening: The best way to cure root rot is to stop it from happening in the first place. Always use soil that drains properly, make sure there are enough drainage holes, and don’t water too much during the first month after repotting.
Growth Stagnation: When Recovery Stops
At first, everything seems to be going well—no wilting, no evident indications of distress—but then the plant just… stops. It can be annoying when growth stops after repotting because it’s not always evident what’s happening.
Normal vs. worrying recovery patterns: Most lavender will start to grow again after 3–4 weeks of being repotted throughout the growing season. It’s time to look into things if you don’t see any new development after 6 to 8 weeks or if the growth you do observe is stunted or discolored.
Things that often make things stop moving:
- Overpotting: Putting a plant in a pot that is too big will limit its growth since it has to deal with the extra dirt.
- Nutrient imbalance: Adding too much fertilizer, especially nitrogen, might make leaves grow faster than roots.
- Environmental stress: Recovery might be slowed by inconsistent watering, changes in temperature, or not enough light.
- Incomplete root establishment: Sometimes roots don’t grow into the new soil and stay in the original root ball.
How to tell if something is wrong: Use your finger to gently poke around the base of the plant. The roots aren’t settling in properly if the initial root ball feels dry but the soil around it is wet. You can have a drainage or overwatering problem if the whole root zone feels wet.
Ways to get better:
- If your pot is too big, think about shifting to a smaller one.
- If you have problems with nutrients, stop fertilizing and pay more attention to watering.
- To deal with environmental stress, deal with certain factors like light, temperature, and humidity.
- If the roots aren’t growing well, a very light massage or the addition of mycorrhizal fungi can help.
Pro Tip: I’ve learned that putting a little bit of mycorrhizal fungi on plants that aren’t growing may frequently get them going again. These helpful fungi work together with lavender roots to help them take in more nutrients and grow better.
The End
It takes both skill and science to correctly repot lavender. You need to watch it closely, time it right, and use a light touch. In this complete tutorial, we’ve looked at what makes lavender different from other container herbs, learned how to tell when it’s time to repot, and discovered the step-by-step technique that guarantees success.
Keep in mind that lavender comes from the Mediterranean, so it has different demands than other houseplants or yard herbs. We need to be patient and observe the plant’s natural rhythms when we repot it because of its woody roots, predilection for soil that drains well, and sensitivity to root disturbance.
The five clear symptoms we talked about—root spiraling, problems with water drainage, stunted growth, problems with flowering, and physical instability—are a good way to know when to repot your plants. Spring is still the best time to do this, but with the right care, it can be done in other seasons if needed.
Choosing the right container and getting the soil ready are just as crucial as the way you repot the plant. The ideal pot size, material, and drainage system are the building blocks for years of healthy development. The right soil mix makes sure your lavender can thrive in its Mediterranean-style setting.
When difficulties come up, which they do from time to time, keep in mind that most repotting problems can be fixed quickly and with the right care. If you catch wilting, root rot, or growth stagnation early and deal with them in a methodical way, you can fix them.
Your lavender is stronger than you might imagine. You now have the skills and information you need to take care of your plants the way they deserve. Believe in the process, look for clues, and don’t be afraid to move your lavender when it tells you it needs more space.
What’s next? Look at your lavender plants again with fresh eyes. Look for the indicators we talked about and start making plans for how to repot your plants. You now know how to take care of your lavender so that it will grow for years to come, whether you need to act right away or are just getting ready for next spring.
Questions That Are Often Asked
How often do I need to repot lavender plants?
Most container lavender plants need to be repotted every two to three years, however this can change a lot depending on the plant’s age, type, and growing conditions. You might need to repot young, healthy plants every year for the first few years. Mature plants, on the other hand, may be fine for 3 to 4 years without repotting. Instead of sticking to a strict timetable, you should look for the five signals we talked about. Spanish lavender and other fast-growing types usually need to be repotted more often than compact English lavender types.
Can I use normal potting soil to repot lavender?
Lavender doesn’t like potting soil that holds too much moisture, which might cause root rot. A mix that drains well and is somewhat alkaline is what lavender needs to grow like it does in its native Mediterranean soil. You can either buy potting mixes that are specifically made for cacti, succulents, or Mediterranean plants, or you can make your own by mixing 40% quality potting mix, 30% coarse sand or perlite, 20% aged compost, and 10% fine gravel. This makes the lavender’s habitat quick-draining, which is what it needs to grow well.
How big of a pot can I use for lavender?
Don’t give in to the urge to make things bigger than they need to be. When you repot lavender, only make the pot 2 to 4 inches bigger in diameter. A mature English lavender plant doesn’t need a pot bigger than 16 inches, but a Spanish lavender plant might need a pot that is 18 to 24 inches wide. Too much moisture surrounding the roots might slow down growth instead of helping it, so using containers that are too big is not a good idea. Using one really big pot is not as good as repotting more often into pots that are the right size.
Should I add fertilizer to lavender when I repot it?
Don’t fertilize for at least 4 to 6 weeks after you repot. The plant needs time to become used to the new soil and grow its roots. Fertilizer might actually make a plant that is recovering more stressed. Most good potting mixes have enough nutrients to keep the plant alive until it gets used to its new home. You can start feeding the plant again using a balanced, low-nitrogen fertilizer made for Mediterranean plants after you see new growth and the plant looks healthy.
Is it okay to repot lavender when it’s in bloom?
During active blooming times, it’s recommended not to repot because the plant is putting a lot of energy into making flowers and is more likely to experience transplant shock. Cut back the flower spikes before you repot a blossoming plant because of an emergency (such severe root rot). This will let the plant focus its attention on healing its roots. You should wait until the flowering cycle is over, or you should arrange your repotting at the time before buds start to form.
How can I tell if my lavender is pleased after I repotted it?
Within 2 to 4 weeks, a correctly repotted lavender will show various signs of health, including as new growth at the ends of branches, better leaf color and hardness, an upright stance, and eventually, strong flower spike development. The plant should also start taking in water normally again. The soil should dry out properly between waterings instead of lingering moist or drying out too rapidly. Most essential, trust your nose. Healthy lavender should smell like lavender.
What should I do with lavender cuttings when I repot them?
If you wish to grow more lavender, now is the perfect time to take cuttings. When you cut down damaged or circling roots, you may also need to cut back some of the top growth to keep things in balance. You can use these healthy stem cuttings (4 to 6 inches long) to grow new plants. Take off the bottom leaves, immerse the plant in rooting hormone, and put it in a propagation mix that drains well. For 4 to 6 weeks, keep them in bright, indirect light and make sure they stay hydrated.


