

How to Propagate a Jade Plant: Leaf Cuttings Root in 3 Weeks, Stem Cuttings in 4 — Both Methods Shown

Learn how to propagate a jade plant using stem cuttings and leaf propagation — with honest success rates, the tug test, and why most cuttings rot.
Jade plants (Crassula ovata) are among the easiest houseplants to propagate. In the wild, a stem that breaks off and falls to the ground will root itself within weeks — no assistance required. That same resilience works in your favour indoors. You can take a three-inch cutting from your jade today and have a rooted, growing plant within four to eight weeks.
Both propagation methods — stem cuttings and leaf propagation — work. But they’re not equal. Stem cuttings root in four to eight weeks with an 85%+ success rate. Leaf propagation takes two to three months and succeeds around 60–70% of the time [6]. This guide covers both in full detail, including the step most articles gloss over: the callous period and why skipping it is the reason most jade cuttings rot.
When to Propagate
Spring and early summer give you the fastest results, and the difference in rooting speed is significant enough to plan around [1].
Crassula ovata is a CAM (Crassulacean Acid Metabolism) succulent — it does much of its metabolic work at night. During spring and summer, longer days and warmer temperatures accelerate the hormonal signals that drive root development. A cutting taken in April may root in four to six weeks. The same cutting taken in January can take eight to ten weeks, because the biological machinery is running at a fraction of its peak rate.

Three pre-planned garden beds, free
Stop staring at empty beds: printable plans with exact layouts, plant lists and planting calendars — yours free from the Garden Library.
| Season | Expected Rooting Time | Notes |
|---|---|---|
| Spring (Mar–May) | 4–6 weeks | Optimal — active growth, warm temps, long days |
| Summer (Jun–Aug) | 5–7 weeks | Good, but avoid direct sun during the callous phase |
| Autumn (Sep–Nov) | 6–8 weeks | Slowing growth — still manageable |
| Winter (Dec–Feb) | 8–10 weeks | Use a heat mat (21–24°C) to restore spring-equivalent speed |
If you have a choice, take cuttings between March and June. You’ll get faster results, and the young plants have a full growing season ahead to build strength before winter.
What You’ll Need
The soil mix matters more here than for most houseplant tasks. Standard potting compost retains too much moisture and will cause cuttings to rot before they root.
- Propagation mix: 1 part potting compost, 1.5 parts perlite, 1 part coarse sand or pumice. Aim for 60–70% mineral content — this mimics the dry, rocky soils jade grows in natively in South Africa [1].
- Small pots or seedling trays with drainage holes (terracotta is ideal — it wicks away excess moisture faster than plastic)
- Clean, sharp scissors or a blade — blunt cuts crush stem tissue and invite disease
- Rubbing alcohol (70% isopropyl) to sterilise your cutting tool before use
- Rooting hormone (optional) — not necessary for jade, but may marginally speed up stem cutting development
One detail that rarely gets mentioned: sterilise your cutting tool before and between cuts [5]. Jade stems are fleshy and open wounds are prime targets for fungal pathogens like Botrytis. A quick wipe with 70% isopropyl alcohol costs nothing and meaningfully reduces the risk of rot entering the wound.
Method 1: Stem Cuttings (Recommended)
Stem cuttings are faster, more reliable, and produce plants that reach a compact, full size much sooner than leaf propagation. If your jade has multiple branches to spare, this is the method to use.
Step 1: Take the Cutting
Select a healthy, firm stem with glossy leaves and no signs of pest damage or discolouration. The cutting should be:
- 3–4 inches long (7–10 cm) — shorter cuttings have fewer stored energy reserves; cuttings over 15 cm may develop shallow roots because they don’t need to work as hard to sustain themselves [4]
- Cut at a 45-degree angle just below a leaf node — the angled cut maximises the surface area for callus formation and root emergence
- Non-woody — very old, bark-covered stems root eventually but much more slowly. Look for semi-mature growth that is firm but still greenish.
Once cut, remove the lower one or two leaf pairs to expose two to three bare nodes along the base of the cutting. These exposed nodes are where roots will emerge. Keep three to four pairs of leaves at the top to support the cutting while it roots.
Step 2: The Callous Period
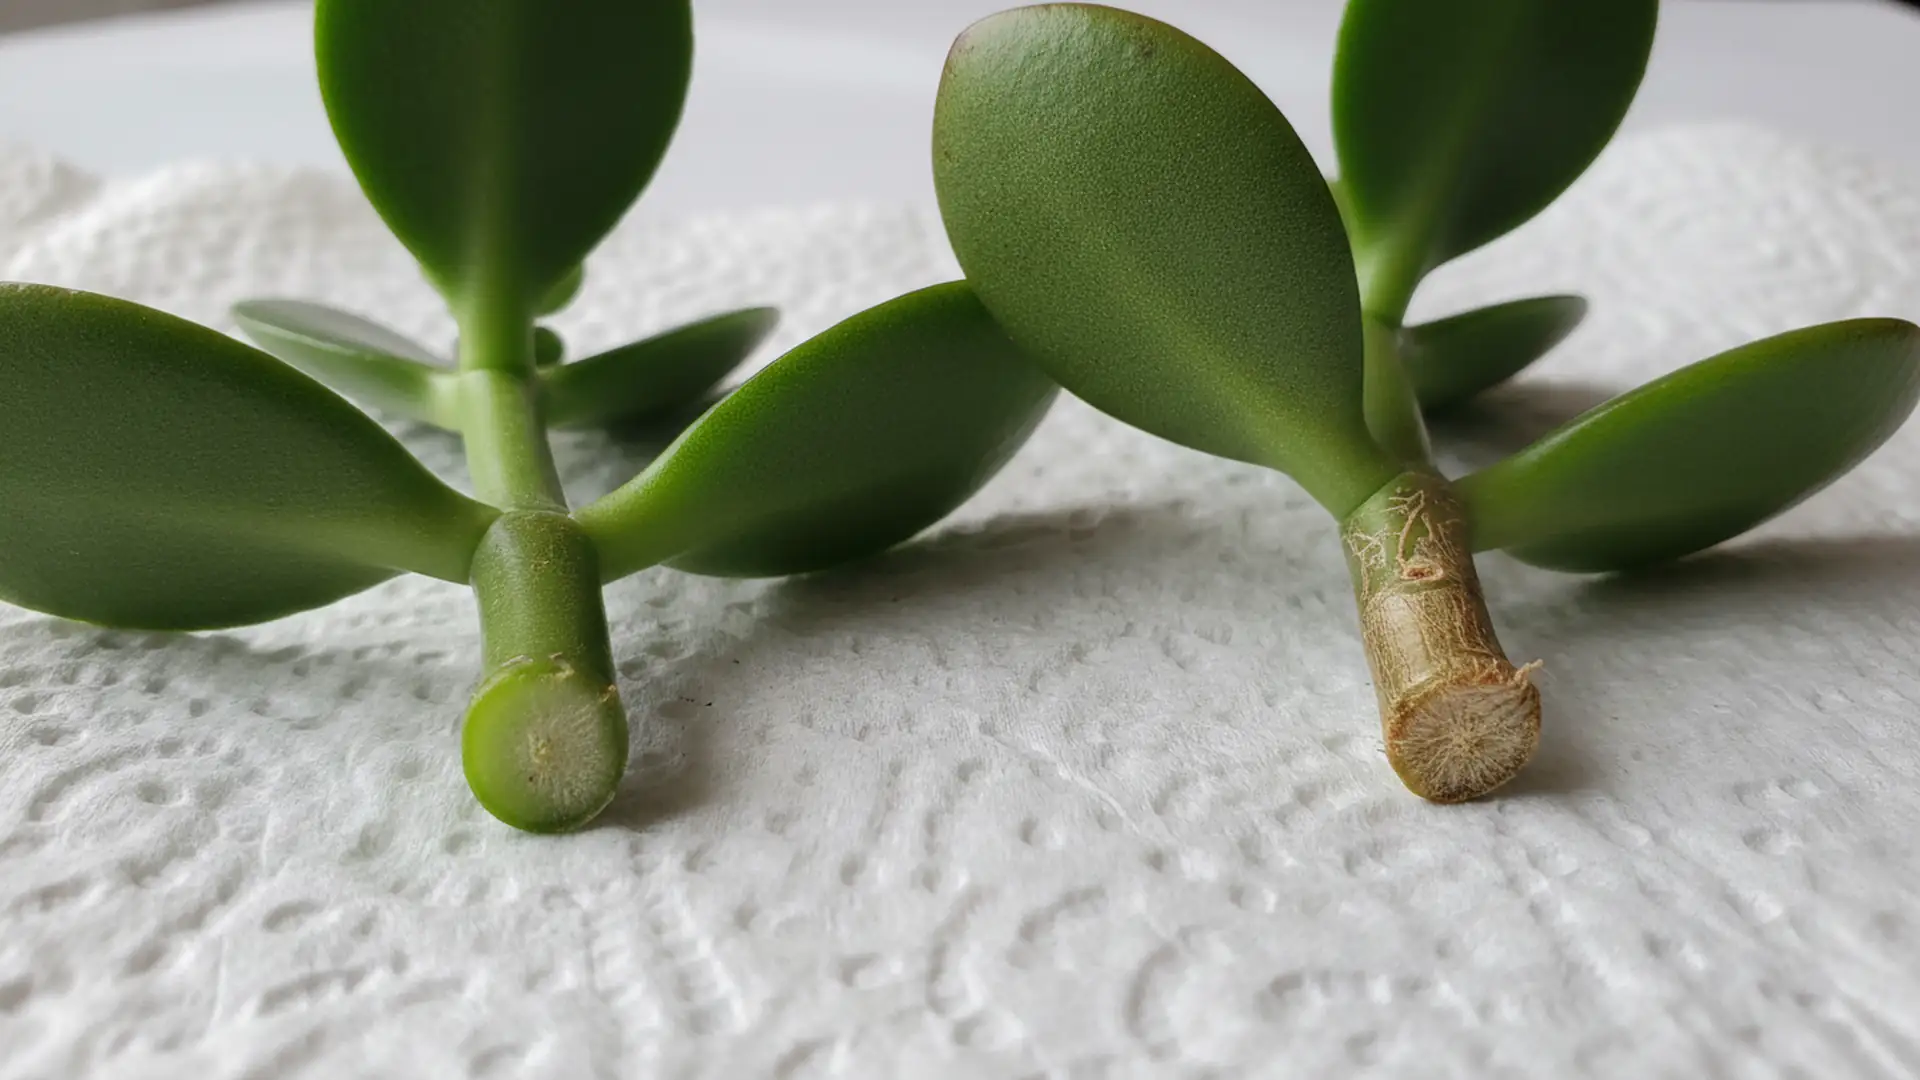
This is the step that determines whether your cutting lives or dies — and the one most beginners either rush or skip entirely.
When you cut a succulent stem, the exposed wound contains open vascular tissue — xylem and phloem — surrounded by moist, nutrient-rich cell content. If that wound makes contact with even slightly damp soil before it seals, bacteria and fungi will colonise it within days. The cut end turns black or brown and mushy. The cutting is lost.
The callous is a dry, corky layer that forms naturally as the cut surface desiccates. Once calloused, the sealed end is largely water-impermeable and resistant to fungal entry. Think of it as the plant forming a scab over the wound.
How to callous correctly:
- Set the cutting on a dry paper towel or tray — not in soil, not in water
- Place in a warm spot (18–22°C) with indirect light and good air circulation
- Leave it alone for 3–5 days in normal household conditions (40–50% humidity)
- In humid climates or damp rooms above 60% RH, extend to 5–7 days — a wet atmosphere slows drying and leaves the wound vulnerable for longer
- The cut end is ready when it looks dry, pale, and slightly papery — no longer wet or green
The first time I lost a batch of jade cuttings, it was because I planted them the day after cutting — figuring a day was long enough. The base of every single one had gone soft and black within ten days. A proper 4-day callous on the next batch and not one rotted. If you’re unsure whether the callous is ready, wait another day.
Step 3: Plant in Dry Mix — and Don’t Water for Two Weeks
Once properly calloused, plant the cutting in your gritty propagation mix. Push the bare nodes into the soil so that two to three nodes are buried and the foliage sits above the surface.
Now comes the counterintuitive part: don’t water for the first two weeks.
This runs against every instinct. But the biology works in your favour. When there is no moisture in the soil, root tips grow outward in search of it — a process called positive hydrotropism. Those actively searching roots develop more strongly and reach deeper than roots that find moisture immediately and have no incentive to extend. Cuttings watered immediately after planting often produce shallow root systems that struggle once moved to their permanent home [6].
Stop missing your zone's planting windows.
Select your US zone and month — get a complete checklist of what to plant, prune, feed, and protect right now.
→ View My Garden CalendarThe cutting isn’t suffering during this window. Its thick, waxy leaves are reservoirs of stored moisture — exactly what Crassula ovata evolved to use during dry seasons in South Africa. It will look absolutely fine.
After two weeks, begin light watering: dampen the top inch of soil, then let it dry completely before watering again.
Step 4: The Tug Test
You can’t see what’s happening underground, but you can feel it. Once you’re three to four weeks in, try the tug test: grip the cutting gently near the base and apply a slow, steady upward pull — a few grams of resistance, not a yank.
- Cutting slides out easily → no roots yet; plant it back and wait
- Slight resistance → roots beginning to anchor; a good sign
- Holds firm → root system is established; you can begin a more regular watering rhythm [4]
Don’t test too early or too often. Disturbing a cutting before roots form can damage emerging root hairs. Wait at least three weeks before the first tug test, then check no more than once a week.
Tip: Pot Multiple Cuttings Together
One technique that rarely gets mentioned: if you have several stem cuttings, pot three or four together in the same container rather than one per pot. The result is a fuller, bushier plant that looks established much sooner — rather than a single-stemmed cutting that takes years to branch out naturally. Space the cuttings evenly around the edge of the pot and let them root together [5].
Method 2: Leaf Propagation
Leaf propagation is slower and has a lower success rate than stem cuttings. So why bother? It’s useful when your jade is young and you don’t have stems to spare without disfiguring the plant. And there’s something genuinely satisfying about watching a baby jade emerge from a single leaf over a couple of months.
Just go in with realistic expectations: around 60–70% of leaves will root and produce plantlets. Some will simply dry out and die. That’s normal, not a sign you’ve done anything wrong.
Jade leaf propagation follows the same general approach as propagating Echeveria — though jade tends to be slightly slower to form plantlets. Haworthia, by contrast, is notoriously unreliable from leaf propagation and is much better propagated via offsets. For a full species comparison and troubleshooting table, see the succulent leaf propagation guide.
Step 1: Remove the Leaf with a Clean Snap
The single most important variable in leaf propagation is whether the base node comes away intact. The node — a small cluster of meristematic tissue at the leaf base — is where roots and the new rosette will form. Without it, the leaf simply cannot produce a new plant. It will sit on the soil for weeks before slowly withering.
Technique: hold the leaf near its base and twist it gently back and forth while applying slight downward pressure. The leaf should snap off cleanly, leaving a small pale nub of tissue visible at the base. That nub is your success indicator.
If the base looks torn, stringy, or the nub is missing, set that leaf aside — it won’t propagate. Do not cut leaves with scissors or a blade; cutting severs the vascular connection and leaves the node behind on the stem.
Step 2: Callous, Then Lay on Dry Soil
Let the removed leaf rest on a dry paper towel or tray for one to two days. Jade leaves have smaller wound surfaces than stems and callous faster. Once the cut end looks dry and no longer feels sticky, the leaf is ready.
Lay the leaf flat on the surface of dry propagation mix, with the base end touching or just resting on the soil. Don’t bury it. Don’t press it in. The leaf simply needs the base node to make contact with soil so the emerging roots have somewhere to anchor [2].

Step 3: Mist Only
Leaf propagation care differs from stem cutting care in one important way: because a single leaf has much smaller moisture reserves than a stem, you do need to provide some humidity — but carefully.
The protocol: no water at all until you see the first tiny pink or white roots at the leaf base (typically three to six weeks). Once roots appear, begin misting the soil surface very lightly every three to four days. Never pour water onto the leaf or soak the soil. The leaf itself remains the primary moisture source for the developing plantlet; the misting just keeps the surface barely damp to encourage roots to grow downward.
The mistake that kills most leaf batches is misting before roots form. If your leaves turn mushy and black at the base, moisture before callusing or before roots appear is almost certainly the cause.
Step 4: The Timeline — Be Realistic
Leaf propagation tests patience. Here’s what to expect [4]:
| Timeframe | What You’ll See |
|---|---|
| Days 1–2 | Callous forms at the leaf base |
| Weeks 3–6 | Tiny pink or white roots emerge from the base |
| Weeks 4–8 | A small rosette of jade leaves appears at the base of the original leaf |
| Weeks 8–12 | The new plantlet has 4–6 leaves; the original leaf begins to shrivel |
| Week 12+ | Original leaf detaches naturally; plantlet is ready to pot individually |
Don’t remove the original leaf until it has fully shrivelled and detaches easily on its own. It feeds the developing plantlet through its entire early life. Removing it early cuts off the food supply before the new plant can photosynthesise independently.
Don’t discard leaves before the eight-week mark. Some jade leaves are slow starters — they can sit dormant on the soil surface for weeks before roots appear. As long as the leaf looks plump and healthy rather than shrivelled, it may still produce a plant.
Water vs Soil: Which Is Better for Rooting?
Water propagation for jade cuttings works — you’ll develop visible roots in a jar of water within two to three weeks, which makes it visually satisfying and a useful experiment. But the roots that form in water are structurally different, and that difference matters when you eventually move the cutting to soil [6].
Roots that develop in water form with very little structural rigidity. They’re adapted to an aquatic environment: thinner, with fewer root hairs designed for soil nutrient uptake. When you transfer them to compost, they essentially have to rebuild — creating a transplant shock lag of one to three weeks while the plant develops roots adapted to the new medium. Some cuttings struggle to make this transition and decline.
Soil propagation produces roots already adapted to the final growing medium. There’s no adaptation period. The roots begin absorbing nutrients and anchoring firmly from the start.
The verdict: use water propagation if you want to observe rooting visually or aren’t ready to plant immediately. But for the strongest result, soil is the better method. If you do propagate in water, transfer to soil the moment roots reach 1–2 cm long — before they become fully adapted to the aquatic environment and the transition becomes harder.
Potting Up Young Plants
Once stem cuttings pass the tug test, or leaf-propagated plantlets have their own root system and four to six leaves, it’s time to move them into a proper container.
- Pot size: Start small — a 5–7 cm pot is right for most young jade plants. Too large a container holds excess soil, which stays moist longer and increases rot risk. Jade grows slowly and prefers to be slightly snug.
- Soil: Move to a standard succulent or cactus mix. The very gritty propagation mix is excellent for rooting but lacks the nutrient content for sustained growth. A 2:1:1 blend of potting compost, perlite, and coarse sand works well for the growing phase.
- After potting: Wait three to five days before the first watering. Any root disturbance during the move benefits from a short healing window before moisture is introduced.
- Light: Bright indirect light for the first two to three weeks. Avoid direct midday sun until the plant has settled.
Jade plants grow slowly — roughly 5–10 cm per year under good conditions [1]. Once you see roots appearing at the drainage holes, move up by one pot size. For more on the full growing journey from young plant to mature specimen, the jade plant care guide covers repotting, feeding, and long-term care in detail.
Why Do Jade Cuttings Fail? The Most Common Causes
Most jade propagation failures come back to one of five causes. The first accounts for the majority of losses:
1. Rot from premature watering
The single biggest killer. Watering before the cut end has calloused, before the callous has fully dried, or too soon after planting (before roots form) all allow moisture into open wound tissue. Prevention: callous fully, plant in dry mix, wait two weeks minimum before the first water. If the base of your cutting has gone soft, brown, or black, overwatering is almost certainly the cause.
2. Humid environment during the callous phase
Even without direct watering, high ambient humidity (above 60% RH) slows drying and can introduce fungal spores into still-open tissue. If you’re propagating in a humid room or bathroom, extend the callous period to 5–7 days and ensure good air circulation. A small fan pointing toward the cuttings helps.
3. Incomplete leaf node (leaf propagation only)
If the base node is left on the stem when you remove the leaf, that leaf cannot root. No technique or product will fix a leaf without its meristematic tissue. Set it aside and start with a new leaf removed using the twist technique.
4. Cutting taken from old, woody growth
The older and more lignified the stem, the harder it is to root. Old stems can root, but they’re slow — and if conditions aren’t perfect, they may fail where younger growth would have succeeded easily. Always take cuttings from younger, semi-mature greenish stems when you have a choice.
5. Wrong soil mix
Standard houseplant compost stays damp for days around the base of a cutting, even in a pot with drainage holes. That moisture creates the same rot-friendly environment as premature watering. Use a high-mineral propagation mix (60–70% perlite, pumice, and coarse sand) for the entire rooting phase.
Frequently Asked Questions
How long does jade plant propagation take?
Stem cuttings typically root in four to eight weeks in spring or summer. Leaf propagation takes eight to twelve weeks before the plantlet is large enough to pot individually. Both methods are slower in winter — a heat mat set to 21–24°C restores near-spring rooting speed if you’re propagating out of season.
Do I need rooting hormone?
No. Jade plants root readily without it. If you choose to use powdered rooting hormone, apply a light dusting to the calloused stem end before planting — but it’s not necessary and many experienced growers never bother. Don’t use liquid rooting hormone formulated for other plants without checking the dilution; some concentrations are too high for succulents.
How many leaves should I propagate?
More than you think you need. At a 60–70% success rate for leaves, if you want five new plants, start with eight to ten leaves. For stem cuttings at 85%+, a small buffer of one or two extra is enough.
Why has my cutting gone limp?
Slight softness in the leaves during the first week after planting is normal — the cutting is drawing on its stored moisture while roots develop. If it becomes severely limp, or the lower stem goes soft and discoloured, rot has likely entered at the base. Check immediately: soft, brown tissue at the base means overwatering or premature planting; firm but wrinkled leaves usually mean the cutting needs slightly more ambient humidity.
Can I propagate jade in water?
Yes, but the roots that form are weaker than soil-grown roots and cause transplant shock when moved to compost. For the strongest plants, propagate in soil from the start. If you use water, transfer to soil the moment roots reach 1–2 cm — before they become fully water-adapted.
Sources
- University of Wisconsin-Madison Division of Extension. Jade Plant, Crassula ovata. UW Horticulture.
- University of Connecticut Home & Garden Education Center. Jade Plants. UConn Extension.
- North Carolina State University Extension. Crassula ovata. NC State Extension Gardener Plant Toolbox.
- Epic Gardening. How to Propagate Jade Plants. Epic Gardening.
- Plantura Garden. Propagating Jade Plants. Plantura.
- Spider Farmer. How to Propagate Jade Plant in Soil and Water. Spider Farmer Blog.


