The Complete Guide to Planting Asparagus for a 20-Year Harvest
TL;DR
- Commitment: Planting asparagus is a long-term investment that can yield harvests for over 20 years. Success depends heavily on proper initial planting.
- Best Variety for Yield: For the highest productivity and lowest maintenance, choose an all-male hybrid variety like ‘Jersey Knight’ or ‘Millennium’. They produce up to three times more than heirloom varieties because they don’t expend energy on seed production.
- Soil is Everything: The most critical step is soil preparation. Use the “double-dig” method to create a deep, loose soil structure (18-24 inches).
- Feed the Soil Deeply: Before planting, amend the bottom of the trench with a rich mix of compost, well-aged manure, and a high-phosphorus source like bone meal. This is your only chance to get nutrients to the deep root zone.
- Patience is Key: Do not harvest any spears in the first year. Allowing the ferns to grow fully builds the root system’s energy stores (the “engine”) for all future harvests.
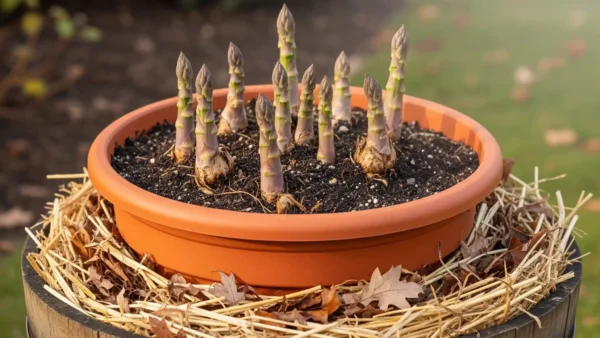
- Planting Method: Plant 1-year-old crowns on mounds within a trench, spreading the roots out. Backfill with only 2-3 inches of soil initially, then gradually fill the trench as the ferns grow throughout the first season.
A 20-Year Act of Horticultural Faith
Putting in an asparagus bed is a very important act of faith in gardening. A tomato plant gives you its rewards in a few months, while asparagus needs your time, effort, and planning. It is a long-term commitment, a horticultural legacy that will pay off your hard work for decades to come. An established asparagus patch becomes a beloved element of a garden’s rhythm. It can serve your family for twenty years or more. The job you do on planting day is, without a doubt, the most important work you will ever do for this crop. This is because it takes a lot of time and space. If you make mistakes now, like choosing the wrong variety or not preparing the soil properly, your patch’s health and productivity could suffer for the rest of its life.
There are a lot of instructions that will show you how to dig a trench. This is not like other guides. We won’t think of planting asparagus as just a basic gardening task. Instead, we’ll think of it as the first step in constructing a food production system that will last for decades. We will look into the underlying science of making “legacy soil,” the important option of which plants to grow, and the long-term effects of every choice you make on planting day. This is the best way to do it perfectly the first time, so that your act of faith will pay off with a big crop for a generation.
Choosing the Right Asparagus: Your Most Important Decision
You need to choose your type before you even think about using a shovel. This one decision, which you make before you start any physical effort, will affect how much you get, how much work your patch needs, and even the color and taste of your spears. It is the genetic code for the next twenty years.
The Great Yield Debate: Heirloom vs. All-Male Hybrids
The biggest difference between types of asparagus is between older heirlooms that are open-pollinated and newer hybrids that are exclusively male. Knowing this difference is important for keeping your expectations and workload in check.
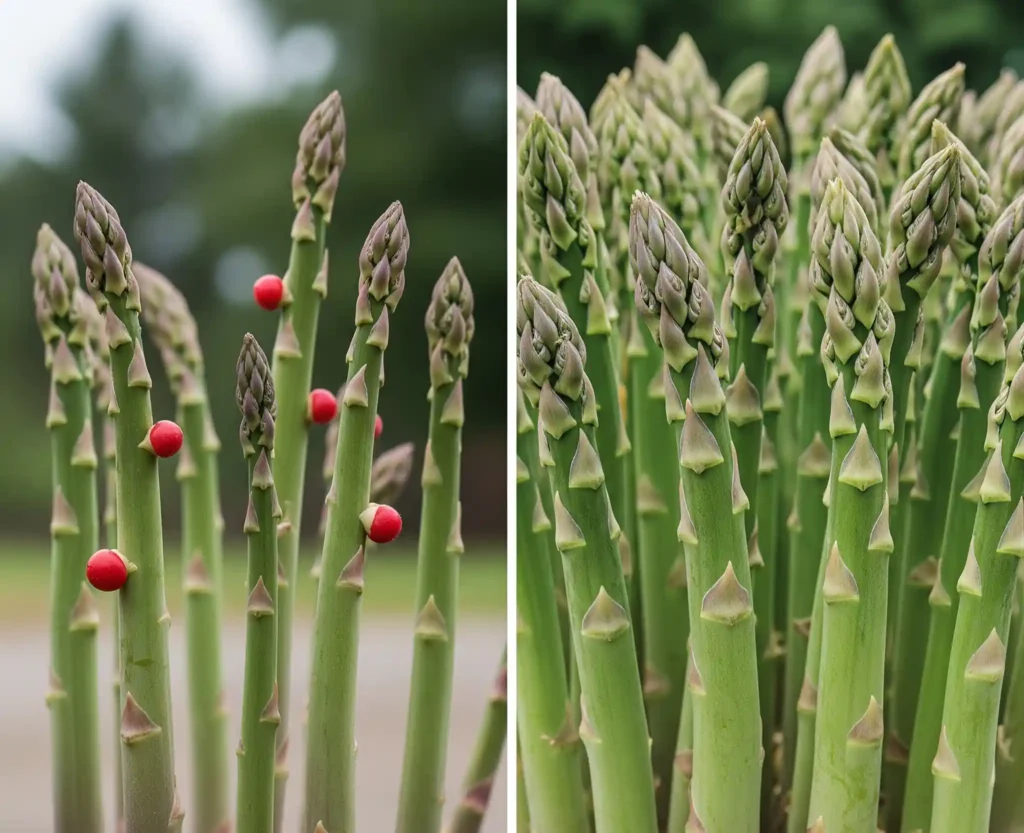
- Heirloom Varieties (like ‘Mary Washington’): These are the tried-and-true types that our grandparents grew. They are “dioecious,” which implies that a group of crowns will have plants of both sexes. The female plants are completely healthy and are typically valued for their genetic diversity, but they have to use a lot of their stored energy to make small, red, inedible berries that have seeds in them. This use of energy immediately lowers their spear output, which means that they get less overall yield than males. Also, these berries that fell will grow into volunteer seedlings the next spring. If you don’t carefully pull away these seedlings, they will soon fill up the bed, competing with the parent crowns for water, sunlight, and nutrients. Over time, this will make the patch messy and less productive.
- All-Male Hybrids (like the ‘Jersey’ Series and ‘Millennium’): These modern wonders are the result of complex breeding procedures that are meant to get the most out of the plants. They are much more productive for one simple reason: they don’t waste any energy on making seeds because there are no female plants around. All of the accumulated carbohydrate energy from the last season goes straight into making additional spears, which are often thicker. For the home gardener, this can imply that the bed will produce three times as much over its lifetime as a heritage variety. They also don’t make any volunteer seedlings, which makes the patch cleaner and easier to care for.
Purple Varieties: A Choice for Foodies
Different types, such “Purple Passion” and “Sweet Purple,” give you a unique taste and look. In the garden, they look amazing with their deep purple spears that make a striking contrast. These types have around 20% more natural sugar (glucose and fructose) and less fibrous material than their green cousins. This makes them very sweet and soft, and they are typically eaten raw in salads. Anthocyanins, which are strong antioxidants that are also found in blueberries and blackberries, give the fruit its purple color. The trade-off for this unusual taste and look is that they usually don’t produce as many plants as the all-male green hybrids and are dioecious, which means they make both male and female plants. It’s also important to know that the gorgeous purple anthocyanin pigments break down when they are heated, so the spears will turn green when they are cooked.
Expert Tip
If you’re a home gardener whose main goal is to get the most out of your space, I strongly recommend an all-male hybrid like “Jersey Knight” or “Millennium.” The amount of food that the bed produces over its lifetime is amazing. You are putting in years of work before your first large harvest. Don’t make things worse for yourself by picking a less prolific variety from the start.
Crowns vs. Seeds: It All Comes Down to Time and Effort
Most of the time, asparagus is planted from dormant, bare-root crowns, however it is feasible to put seeds. This is the trade-off: it’s mostly a matter of patience vs cost.
- Seeds: Starting from seeds is fairly cheap, and you can get a larger selection of unusual or unique kinds that may not be accessible as crowns. But it is a big job. You need to start the seeds indoors in a sterile seed-starting mix, keep them warm (about 75–80°F) for germination, which can be slow and uneven, carefully care for the delicate, grass-like seedlings for a full season, and then wait two more years after transplanting them into their final bed before you can pick your first light harvest. From seed to table, it takes three to four years.
- Crowns: If you buy 1- or 2-year-old crowns from a trusted nursery, you can avoid the most delicate and time-consuming part of the process. The nursery has already done the hard work of getting the seeds to sprout and grow a little bit. You will have your first light harvest one or two years after planting crowns, which is why this is the best and most practical option for almost all home gardeners.
The Foundation of a 20-Year Patch: A Masterclass in Soil Preparation
The most important thing you can do for the long-term health and productivity of your asparagus bed is to work on the soil before you plant. This is your one chance to build the optimal conditions for a root system that will develop huge and stay in this soil for the next twenty years. You can’t fix this afterward.
The Science Behind “Legacy Soil”
Asparagus has a thick, deep root system that works as the plant’s “battery.” The green ferns make energy through photosynthesis all summer long, and this energy is stored as carbohydrates in the huge root crown. The amount of energy stored in the root system this year will directly affect the size and health of next year’s spear harvest. So, your goal is to make the best possible environment for this battery to grow as big and healthy as it can. This means that the soil must have three important qualities: it must drain well (the fleshy crowns will rot in wet soil), it must have a deep, loose structure that lets roots grow freely, and it must have a lot of nutrients that endure a long time.
Step 1: The Double-Dig (A More Advanced Method)
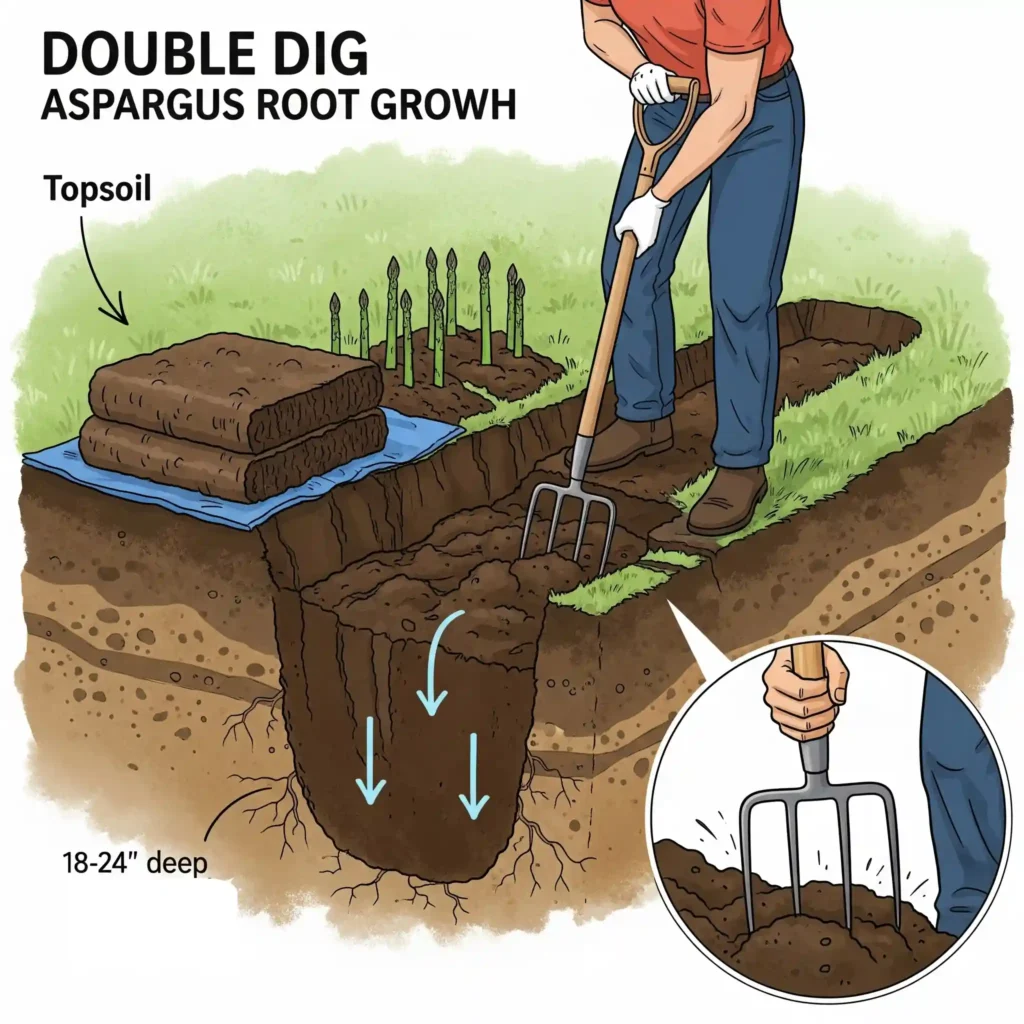
The “double-digging” method is a classic gardening technique for all perennial beds that I think will give you the best soil depth. First, draw a line around your trench that is about 18 inches broad.
- Take up the top layer of dirt from the whole trench, which should be about 10 to 12 inches deep, or the length of a shovel blade. Put it on a tarp. This is your important topsoil.
- When you take off the top layer, you will see the compacted subsoil at the bottom of the trench. This is a thick “hardpan” layer in several yards. Don’t take this layer off. Instead, use a digging fork or broadfork to really loosen this subsoil. Push the fork down as far as it will go and rock it back and forth to break it up. This breaks up the hardpan, making channels for water to flow away and allowing roots to grow deep in the future.
This two-step technique makes a unique area of 20 to 24 inches of deep, loose soil for your asparagus roots to explore. This stops them from stunting, makes them more resistant to drought, and gives them the best chance to grow a huge root system.
Step 2: The Best Mix of Amendments
Now, before you fill up the trench, you will add nutrients to it. Put a strong mix of amendments in the bottom of the trench, on top of the loose subsoil. This is your one chance to get nutrients deep into the roots.
- A 2-inch layer of high-quality compost: This adds a wide range of micronutrients and, most importantly, a lot of helpful bacteria. These microorganisms are very important for the soil food chain because they make nutrients “bioavailable” so that plants may take them in.
- A 1-inch coating of well-aged manure: This gives the ferns the nitrogen they need to flourish in the first year in a gentle, slow-release way. Fresh manure has too much ammonia in it and might burn the fragile new roots, hence it is important that the manure be “well-aged” or “composted.”
- A good amount of a high-phosphorus source: This is very important. Follow the package directions to add bone meal or rock phosphate. The “P” in N-P-K stands for phosphorus, which is necessary for good root growth. Phosphorus is chemically stationary in the soil, so it doesn’t move down with water like nitrogen does. This is your sole chance to get this important nutrient deep down where the new roots will grow.
Use your digging fork to mix these changes into the loose subsoil. After that, mix some compost into the topsoil you put aside on the tarp before using it to fill in the holes.
Step 3: Check and Change the pH
The ideal soil pH for asparagus is between 6.5 and 7.5, which is neutral to slightly alkaline. It grew in areas near the sea where the soil was rich in calcium from seashells. Most of the soil in North American gardens is a little acidic. Even if the nutrients are in the soil, a pH level that is too high or too low might make it hard for plants to take them up. Any garden center will have a simple soil test kit. You can raise the pH of your soil by adding dolomitic lime if it is below 6.5. If it is above 7.5, which is less common, you can lower it by adding elemental sulfur. Use the product according to the rates on the container.
Don’t merely dig a hole; construct one from experience. You will get thicker and more spears for the following twenty years if you spend an hour double-digging and making a rich mix of amendments at the bottom of the trench. This is the best and most significant work you can do for your garden.
A Step-by-Step Illustrated Guide to Planting
Once your trench is ready, planting is easy. How you place and cover the crowns will affect how well they grow and live during their first year, which is very important.
- Soak the Crowns: When you get your bare-root crowns, they may look dry and dead. Soaking them in a pail of lukewarm water for 30 to 60 minutes before planting can rehydrate the tissues and give them a much better start.
- Make the Mounds: Use the altered topsoil to make small, cone-shaped mounds about 8 inches broad at the bottom of the trench you dug. Put these mounds 12 to 18 inches apart down the middle of the trench.
- Drape the Roots: Put one asparagus crown on top of each mound. A good crown should be strong and have a lot of thick, brittle roots. The “mound” method lets you distribute these spidery roots out evenly in a natural, 360-degree arrangement. This keeps them from getting kinked, damaged, or growing into a knotted knot. The latent buds, which look like little, pointy bumps, should be toward the top of the mound, ready to develop straight up.
- The First Backfill: This is a very important stage. Put only 2 to 3 inches of dirt on top of the crowns. Don’t fill the whole trench. The crowns wake up and start to grow as the sun shines on this thin layer of dirt in the spring. If you bury the crowns too deeply at first, they may decay before they have a chance to grow.
- The Gradual Backfill Explained: You will slowly fill in the trench over the course of the first season as the first spears turn into small ferns. Add 2 to 3 inches of soil to the trench for every 6 inches of fresh fern growth, but be careful not to fully bury the ferns. Do this until the trench is full and even with the dirt in the rest of the garden. This method keeps the mature crown well underground (approximately 6–8 inches), which protects it from damage from future cultivation and winter freezes. It also conveniently buries any weeds that try to grow in the trench.
When you get your bare-root crowns, they may look dry and dead. Putting them in a pail of lukewarm water with a spray of liquid seaweed fertilizer for 30 to 60 minutes before planting is like giving a parched person a long drink and a vitamin shot. It gives the tissues water and trace minerals, as well as natural growth hormones that help roots start to grow.
The Most Important Year: The First Year
In the first year, you don’t harvest; you just grow roots. Your patience this year will directly affect how strong and productive all of your future crops will be.
The Science of “Building the Engine”
No matter how tempting it may be, don’t harvest a single spear in the first year. The plant uses each spike that grows into a fluffy fern as a “solar panel.” These ferns soak up sunlight all summer long and use photosynthesis to make energy in the form of carbohydrates. That energy is transferred down to the fleshy roots of the crown, where it is stored. This makes the “engine” bigger and stronger for next year’s growth. Taking spears in the first year is like taking gas from an engine you are still attempting to build. In the first year, you put all your money (the energy from the sun) into the bank (the root crown) without taking any out. The “compounding interest” throughout the years will show up as more and thicker spears.
Watering and Weeding
Weeds don’t perform well against asparagus, especially in its first year. The weeds take away the water, nutrients, and sunlight that the crown needs to grow. Weed the bed by hand very carefully. Be very careful when you work near the new plants because their shallow feeder roots can be easily broken. It’s a disaster to let perennial weeds like grass grow in the crown since their fibrous roots are almost impossible to get rid of without digging up and damaging the asparagus plant itself.
If it doesn’t rain heavily, water your new patch deeply once a week. Watering deeply and not too often makes the roots grow deeper into the soil in quest of water. This makes the plant more drought-resistant and strong for the future.
Things People Get Wrong in the First Year
- Myth: “You can take a small harvest in year one.” This is feasible, but you’re giving up long-term health for a small short-term gain. It’s a bad deal that will hurt the plant for a long time.
- Myth: “The ferns need to be staked.” A healthy asparagus fern is strong enough to stand on its own. If your ferns are drooping, it’s not because they need to be staked; it’s because they aren’t getting enough sunshine or nutrients.
- Myth: “You should fertilize heavily in the first year.” The huge amounts of rich amendments you put when you were getting the soil ready give the plant all the nutrients it needs for its first year. Adding too much nitrogen fertilizer now can make the top growth weak and sappy, which is the opposite of what you want to happen in the first year.
In Summary
Asparagus planting is a long-term undertaking. The secret to making a legacy patch that will feed you and your family for decades is to carefully prepare the soil and be patient in the first year. It takes time and work to set up, but it pays off for a long time. You are not simply planting a vegetable; you are growing a promise of spring that will last for years to come. By learning about the science behind the processes and sticking to the plan, you are making a wonderful tradition that will last for years to come.
Questions and Answers
What is the difference between crowns that are one year old and crowns that are two years old? Which one should I buy? Two-year-old crowns have a bigger, more established root system and will give you a crop that you can harvest one year sooner than one-year-old crowns. But they cost more and might often have greater trouble with transplant shock because their root systems are bigger and more disturbed. For most gardeners, the optimum mix of price, performance, and successful establishment is high-quality, one-year-old crowns from a trusted nursery.
Is it worth it to plant asparagus from seed? Yes, but you need to be very patient. It will take you 3 to 4 years to get your first harvest, compared to 1 to 2 years from crowns. The biggest benefits are that it costs less and gives you access to rare types. If you’re a patient gardener, this is a great endeavor, but for most people who want a fruitful patch immediately, crowns are the superior choice.
I put my asparagus plants too close together. Is there a way to make it better? Moving established asparagus is particularly hard because the brittle, fleshy roots can get hurt quite badly. You can try to dig up and move every other crown in early spring, when the plants are still dormant, if they are only in their first or second year. The root systems will be a huge, tangled mat if the patch is older. In this instance, it’s usually better to deal with the reduced yield and thinner spears that come from too many plants in one area, or to start a new patch with the right spacing.
What is the white stuff on the tops of my asparagus? The white, powdery stuff that is often on bare-root crowns is usually a safe, food-grade clay or diatomaceous earth that the nursery uses to keep the crowns from drying out while they are in storage or on their way to you. It doesn’t mean you have a sickness, and you don’t need to wash it off before planting.
How can I tell whether the crowns I just planted are still alive? Wait. After planting, it can take 2 to 6 weeks for the first spears to appear, depending on how warm the soil is. If the crowns were strong and healthy when you planted them (not mushy or entirely dry), they are probably still alive and only waiting for the ideal conditions to grow. If nothing has grown after 6 to 8 weeks, you can carefully dig up the dirt over one crown to determine if it has rotted or is still solid.


